Planning Software Projects
Contents
Motivation
Many people's first instinct when confronted with a programming task is to jump right into the source code. That's generally a bad idea. Why? Because it requires you to make things up as you go, which as several negative consequences, especially when projects get larger. First, you end up not really knowing where you're going, which makes it difficult to estimate how long it will take or what challenges you might face. It's hard to fully grasp the big picture without knowing what the big picture is. Second, you will most likely have to redo a lot of your work. Inevitably, you'll wind up in a situation where it becomes clear that something you already implemented is, in fact, not going to work for such and such a reason.
There's an easy solution to this, though folks, especially new programmers, try to avoid it: planning (gasp!). Planning provides an extremely useful way to take what can sometimes be an overwhelmingly large and complex project and break it into substantially smaller chunks, allows you to maintain a view of the big picture during the entire development process, and will make debugging (the process of making your code work) substantially simpler.
I recommend you following the topics outlined below in order. However, software development is an iterative endeavor, and so you will likely have to use a combination of these topics, going back and fourth between them as problems are encountered or new requirements crop up.
(Back to top)Requirements and use cases
The first thing that should be done for any software project is to establish what the requirements are. What is the input suppose to be? What's the output suppose to be? How should the output be formatted? What restrictions are there on the implementation? In a programming class, the requirements are often given to you, but it may not always be completely obvious. Unless they are completely obvious, make a list of all the requirements.
Once you have the requirements listed, make a set of use cases. Use cases are examples of how the software will be used and includes specific input and desired output. Use cases can be used to verify that your final project is working as expected. The most crucial thing here is to make enough use cases to uncover any bugs that may exist.
Consider the example of a simple calculator program. It allows the input of decimal numbers and operations between them (+, -, *, /) and should output the result of the calculation. We may list our requirements as follows:
- input in the format:
number operator number - output in the format:
number - output must be the result of applying the given operator to the two inputed numbers, in the order they were entered.
Some use cases are:
- input:
10 - 3, output:7 - input:
5 * 3, output:15 - input:
3 / 2, output:1.5 - input:
4.5 + 16, output:20.5
Program flowcharts
Once you have a set of requirements, and a general idea of how the program will work, you can create a program flowchart. These indicate the steps the program will go through. Lines with arrows denote the flow of control through the program. The flowchart symbols are listed in Figure 3.1.
Fig. 3.1: Flowchart symbols
 | — Start or end a program/procedure. |
 | — Input/output. |
 | — A process (usually an assignment). |
 | — A decision (also called a branch or conditional). |
 | — A subprocess (e.g., a function invocation). |
| — Joins multiply flow branches back together. |
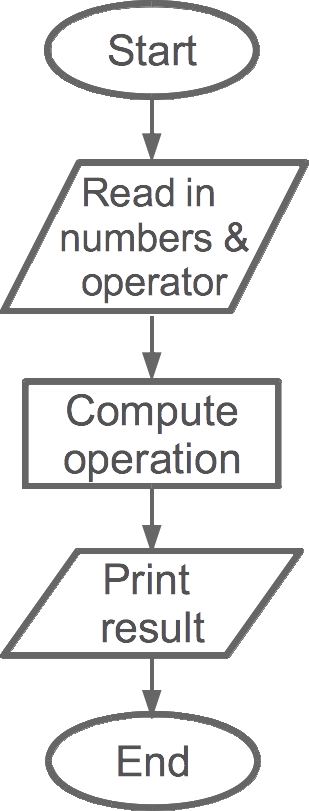
Flowcharts do not have to be perfect when you're just sketching out the flow of your program. Consider this an iterative process, and one that is geared to help you think through how to ultimately implement your program as code. For example, Figure 3.2 shows a high-level, simplistic view of our calculator. It's high level because we don't actually describe how data should be read in in the first parallelogram nor how we should compute the operation. The latter is especially vague, since "compute operation" actually encapsulates several steps, including determining which operator was entered. However, this is a great and simple start to thinking about how the more complex parts will be computed.
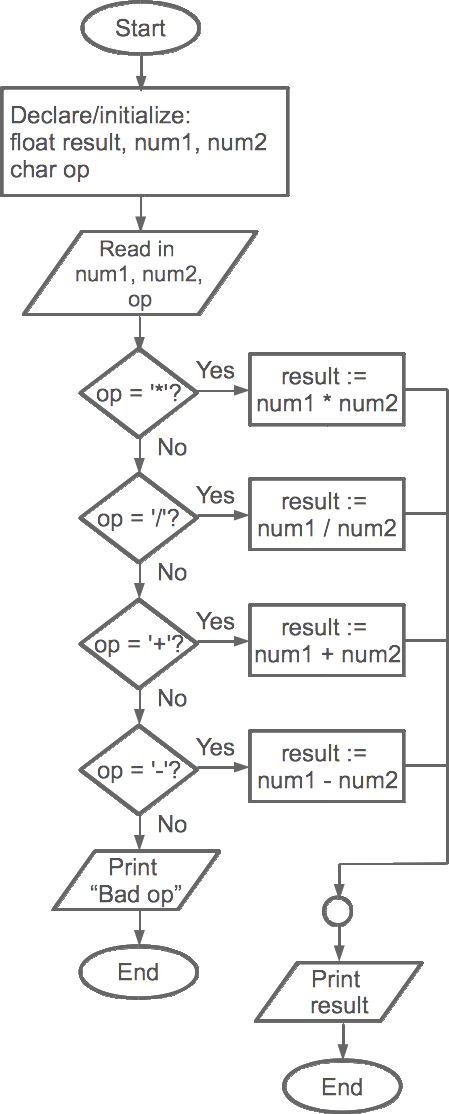
We can refine this simplistic flowchart and add in the details, as shown in Figure 3.3. Here's we've stated what kinds of variables we need, what's being read in, and we've used branching to test which character the operator is. Based on the value of op, we will carry out the specific operation. We even have error handling—if op is not one of *, /, +, -, we print an error message and end the program. If op is valid, then after we carry out the operation, we join all of our branches together and display result.
Without knowing programming basics, must of this will sound confusing. We will revisit flowcharts as we learn about programming concepts. Flowcharts should be used for nearly all of your assignments.
See this page for more details on flowchart symbols. This YouTube video provides some examples of flowcharts.
(Back to top)Pseudo code
Flowcharts are a good way to visualize the flow of control throughout a program. Another helpful tool that looks a bit more like code, but is still independent of a particular programming language, is pseudo code. It's called pseudo because there is no standard syntax—it's completely up to you. This can make the process a bit nerve racking, especially in class, because it's unclear when you've "done it right".
Pseudo code should generally be in English, rather than C++ (for example). This allows your pseudo code to be implemented in different languages. Just like in flowcharting, we can write pseudo code that is very simplified (high-level) or very detailed (low-level). In the end, you want something that is lower level, where each step can be written as one or two lines of code in the target programming language.
Here's an example: let's suppose that we want to write the pseudo code for our calculator example. The first iteration might look something like this:
Calculator:
1. read in two numbers (can be decimals) and an operator from the user
2. compute the result by applying the operator to the two numbers
3. display the result
We can expand this a little to make the beginning steps clearer and to explain how to compute the result. For example:
Calculator:
1. initialize variables: num1, num2, and result (decimals); operator (single character)
2. prompt user and read in num1, num2, and the operator
3. compute the result by applying the operator to the two numbers:
    a. if the operator is *, set result to num1 * num2
    b. otherwise, if the operator is /, set result to num1 / num2
    c. otherwise, if the operator is +, set result to num1 + num2
    d. otherwise, if the operator is -, set result to num1 - num2
    e. otherwise, the operator is invalid -- display an error message and exit
4. display the result
The line numbers are not necessary, but you may find them helpful. You could get more specific, such as writing out exactly what will be printed when prompting the user (e.g., display the prompt: "Please enter two numbers and an operator"). I would say the level above is sufficient, but adding additional details is okay, provided they are not programming language specific.
See this page for another example of pseudo coding.
(Back to top)Skeletons, stubs, and incremental implementation
Flow charts and pseudo code are largely programming language agnostic, meaning they aren't tied to a single programming language. For example, we could take our calculator flowchart in implement it in any of a number of languages—C++, Java, C, Ruby, Python, etc. To move from something abstract like a flowchart to actual code, I recommend starting with a program skeleton consisting of stubs and then incrementally implementing the stubs, being sure to test your code along the way.
A skeleton is a set of code that is usually just an outline without the core bits of logic implemented. All (or most) of the required functions and methods should be present, but their bodies will be empty. Functions with a return type should return a default value. Importantly, the program should compile and run at this stage, even though it won't do anything useful. Let's consider a sample skeleton for our calculator program in C++.
Here we can see that I've added the header, comments, and the main function. The function doesn't do anything, though, other than return 0. Notice that the comments at the top of the file and above main describe the overall program. The comments within main describe the steps to implement in English. This is essential pseudo code. In fact, we can update this skeleton to use the pseudo code we produced in the previous section:
This is a nice example of how useful pseudo code is. When we go to implement, we can tackle one line of pseudo code at a time, ensuring the program compiles after each is implemented. E.g., our first incremental step might look like this:
When you try to compile this, you will get an error. Why? Because operator is a reserved C++ keyword, and we're trying to name a variable after it (you can't name variables after C++ keywords). So we need to change it, perhaps to op:
This compiles and runs, albeit, it doesn't do anything interesting when it runs. But it doesn't fail. Now, if we had not done an incremental implementation, but instead went through and tried to program the entire thing, we would have to go through and change operator to op throughout the whole program.
Now, let's move on to the next step:
This will compile, and we can run it. Here's the process on the command line:
$ g++ calculator.cpp -o calculator
$ ./calculator
Please enter an expression in the format: number1 operator number2: 3 * 5
So it works! Now we can carry out each of the next bits, compiling and testing along the way, until we finally reach our completed program. This might look something like the following:
One more thing about stubs. Though we haven't learned about functions in general, once we do, it'll be helpful to see how this example might look with function stubs. Again, stubs are functions that have the correct outside appearance (i.e., name, return type, and input parameters), but have only comments and place holders for internals. Let's say that we wanted to add a helper function that would carry out the actual computation. It would take the operands and operator, and return the result. Here's the skeleton:
(Back to top)Sandbox
One of the most helpful things I do when I develop is to test out things that I'm not sure about with really simple examples. I do this in what I call a sandbox—a folder on my computer that I can just play around in. The short programs I write don't have to do anything, they're just a way for me to explore syntax or try something out in a small, controlled environment before spending the time to implement it in a full scale project. I recommend that you create a sandbox directory and do exactly that as you work on your programming assignments.